by AntonioFP45
Hi Crew  I've been experimenting with Alclad for 4 years and have maintained a dialogue with Mr. Tony Hipp of Alclad. I hope this will be helpful
Please note that this procedure is different in that it will not get you the "NICKEL PLATED" appearances of brass cars that we've seen since the 1970s. Gray colored base coats help avoid that. IMHO, the appearance will be more prototypical and similar to that of the beautiful HO California Zephyr cars from Broadway Limited (minus the yellow hue) that hit the market a couple of years ago.
The two Budds below were metalized with Alclad 2 Chrome, and lightly weathered. However, a different base color was applied to each car. Amazing what a difference the foundation makes! I was made aware that there have been ongoing "web" arguments with how the sheens of Budd, Pullman Standard, and ACF appear. The answer is that it's varied due to age, care/neglect, weather, etc. Add to that, photos in books/magazines are often edited. In some photos, Post WWII Budd and PS cars look almost "white", yet in some other shots the sheen appears quite dark.
But instead of making this issue an ongoing argument, let's keep it simple. We've basically seen 3 camps regarding stainless steel passenger car sheens:
1. Modelers that prefer the "worn, whitish-gray look" that so many corrugated passenger cars had just before Amtrak.
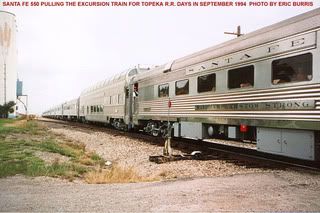
2. Modelers that prefer the beautiful darker stainless steel sheen that many "well taken care of" corrugated cars had when new. Railroads, such as the Santa Fe, Southern, Burlington, and SCL still had right up until Amtrak's formation.
3. Modelers that want a mix of both.
However, based on my experiments, I respectfully suggest that anyone can have both by using the base colors I've experimented with below.
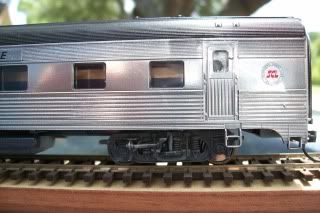
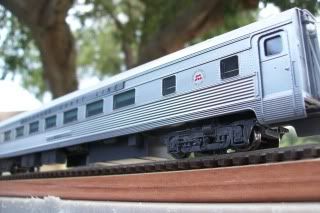
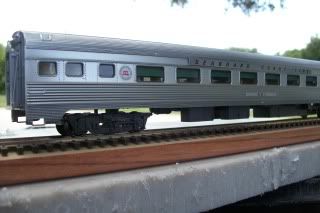
1) Walthers Budd Diner refinished and decaled into the Seaboard Coast Line Railroad scheme. Diner name: St. Petersburgh (ex-ACL). Base foundation color underneath Alclad 2 #ALC-107: NEW YORK CENTRAL DARK GRAY.
Indoor: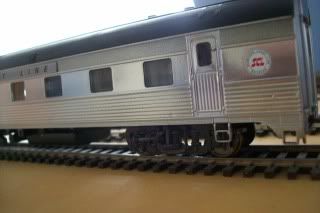

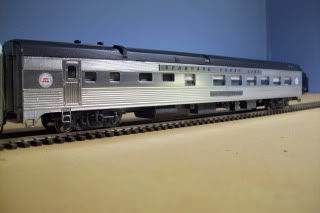
Outdoor: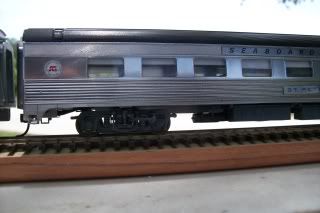

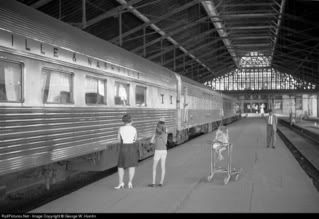
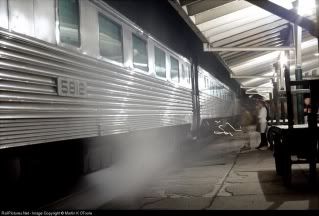
OK, now here's a photo of a prototype SCL passenger train with Budd cars: (photographer: Martin K O'Toole)
---------------------------------------------------------------------------------------------------------------
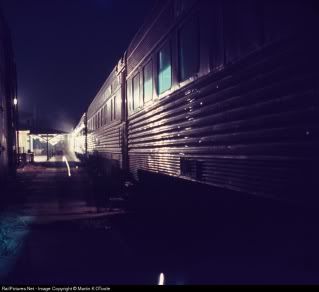
Weather worn effect:
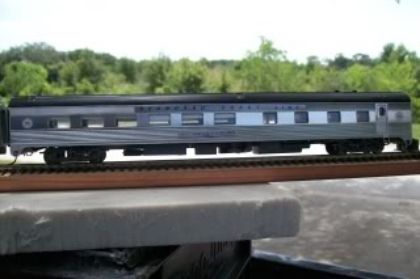
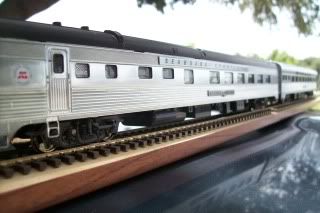
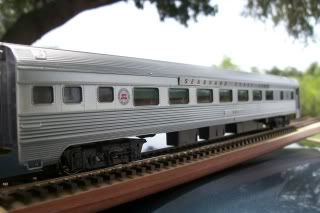
2) Rivarossi Budd Coach metalized and decaled into Seaboard Coast Line Railroad scheme. Coach prototype number: 5211 (ex-Seaboard Air Line). Base foundation color underneath Alclad 2 #ALC-107: NEW YORK CENTRAL LIGHT GRAY.
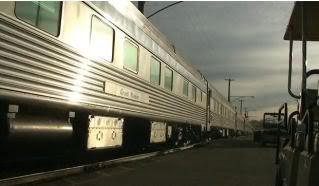
Outdoor Photos: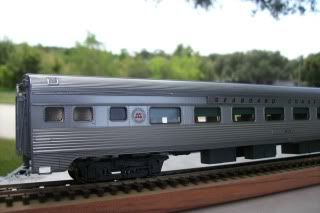
-------------------------------------------------------------------------------------------------------------------------------------------------------------------------------------------
Here is the updated procedure that I've been working with for metalizing plastic shells:
I no longer use black for a foundation base color, as in the past: Based on my experimenting, I now use either New York Central Dark Gray (deep sheen effect) or New York Central Light Gray (faded sheen effect).
1. After paint stripping your shells, wash them thoroughly in soapy water. Scrub gently with a soft toothbrush. Dawn or Ivory Liquid soaps work very well and leave no residue.
2. Make sure the surface is SMOOTH and doesn't feel slippery. It's preferable not to scuff the surface unless absolutely necessary. If so, "very lightly" scuff the surface in a horizontal direction with either a 3M gray scotch pad (available at most Home Depots)or 3M 1500 grit wet/dry sandpaper.
3. Mask off the interior walls and all window openings. Final clean the surface with wax/grease remover.
4. Air brush needle size should be either medium or fine. Apply 1 to 2 thin coats of high gloss gray paint to the exterior. For Scale Coat paint, Mix 1 part thinner to 1 part paint (50/50). Air Pressure for Scale Coat 2 set at 20-25 psi. Practice applying the gray on scrap styrene or junker rolling stock first. The key here is that the final finish appear very smooth and slick. If you're using an acrylic, apply 1 to 2 gloss coats of clear. Allow the finish to cure thoroughly. With SC-II, I now give it 3 to 4 days. For acrylics, it's good to play it safe and wait at least one week.
5. Alclad II Chrome step: Airbrush needle size: FINE works best! I no longer recommend "medium" as in the past. (for Paasche, fine would be a #1 needle) Air pressure: between 12psi and 15psi. The fan width should be very narrow. Air brush distance to shell: 1 to 2 inches. Stroke Speed: medium speed. Not slow, not fast.
5a.Lightly spray each of the sides and roof in long strokes, as if you were using a slim paint brush. Do not dump it on! If you missed a spot, don't worry. Catch it on the next coat. After your first coat, wait 10 minutes. Yes, it looks transparent-dark gray, don't worry, that's normal. Wait 10 minutes. Remember, if you dump it on, you'll be gritting your teeth. (yes, ask me how I know!).
5b. Apply your 2nd Alclad coat, same technique as above. Make sure you get into the little crevices around the diaphrams (I don't bother removing mine). After you finish this 2nd coat, WALK AWAY from the shell and don't look at if for at least 15 minutes. Come back and check it out. If it's still a bit dark, apply a 3rd thin coat of the Alclad. You'll likely be smiling when you finish. Don't worry if it looks too shiny. If a 4th coat is needed, apply it with a slightly faster stroke.
6. Wait 1 to 2 days. Apply even coat of acrylic based Gloss Clear coat. This will tone the shine down slightly. If using solvent based clear, wait at least 3 days. For clears I prefer acrylics.
7. Apply your decals. You can use Microset normally to move decals into postion, however, apply the Microsol lightly around the decal edges.
8. Now for your "sheen effect": Apply another thin coat of gloss clear to seal your decals. Your model's finish should be similar to my Walther's finish.
8a. Decision time. If you want your cars finish to appear more "aged" then add another coat of gloss clear, and so forth until you get the weathered sheen desired. Don't over do it or you'll wind up with a finish that looks similar to a floquil silver .
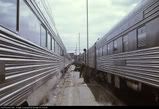
However, before toning down the sheen too much, check photos of the prototypes. The Santa Fe, Atlantic Coast Line, Southern, and CB&Q did a nice job of maintaining their streamlined cars' overall appearances like these prototype shots of the SCL Silver Comet just before the Amtrak era.
Please note that this procedure is different in that it will not get you the "NICKEL PLATED" appearances of brass cars that we've seen since the 1970s. Gray colored base coats help avoid that. IMHO, the appearance will be more prototypical and similar to that of the beautiful HO California Zephyr cars from Broadway Limited (minus the yellow hue) that hit the market a couple of years ago.
The two Budds below were metalized with Alclad 2 Chrome, and lightly weathered. However, a different base color was applied to each car. Amazing what a difference the foundation makes! I was made aware that there have been ongoing "web" arguments with how the sheens of Budd, Pullman Standard, and ACF appear. The answer is that it's varied due to age, care/neglect, weather, etc. Add to that, photos in books/magazines are often edited. In some photos, Post WWII Budd and PS cars look almost "white", yet in some other shots the sheen appears quite dark.
But instead of making this issue an ongoing argument, let's keep it simple. We've basically seen 3 camps regarding stainless steel passenger car sheens:
1. Modelers that prefer the "worn, whitish-gray look" that so many corrugated passenger cars had just before Amtrak.
2. Modelers that prefer the beautiful darker stainless steel sheen that many "well taken care of" corrugated cars had when new. Railroads, such as the Santa Fe, Southern, Burlington, and SCL still had right up until Amtrak's formation.
3. Modelers that want a mix of both.
However, based on my experiments, I respectfully suggest that anyone can have both by using the base colors I've experimented with below.
1) Walthers Budd Diner refinished and decaled into the Seaboard Coast Line Railroad scheme. Diner name: St. Petersburgh (ex-ACL). Base foundation color underneath Alclad 2 #ALC-107: NEW YORK CENTRAL DARK GRAY.
Indoor:
Outdoor:
OK, now here's a photo of a prototype SCL passenger train with Budd cars: (photographer: Martin K O'Toole)
---------------------------------------------------------------------------------------------------------------
Weather worn effect:
2) Rivarossi Budd Coach metalized and decaled into Seaboard Coast Line Railroad scheme. Coach prototype number: 5211 (ex-Seaboard Air Line). Base foundation color underneath Alclad 2 #ALC-107: NEW YORK CENTRAL LIGHT GRAY.
Outdoor Photos:
-------------------------------------------------------------------------------------------------------------------------------------------------------------------------------------------
Here is the updated procedure that I've been working with for metalizing plastic shells:
I no longer use black for a foundation base color, as in the past: Based on my experimenting, I now use either New York Central Dark Gray (deep sheen effect) or New York Central Light Gray (faded sheen effect).
1. After paint stripping your shells, wash them thoroughly in soapy water. Scrub gently with a soft toothbrush. Dawn or Ivory Liquid soaps work very well and leave no residue.
2. Make sure the surface is SMOOTH and doesn't feel slippery. It's preferable not to scuff the surface unless absolutely necessary. If so, "very lightly" scuff the surface in a horizontal direction with either a 3M gray scotch pad (available at most Home Depots)or 3M 1500 grit wet/dry sandpaper.
3. Mask off the interior walls and all window openings. Final clean the surface with wax/grease remover.
4. Air brush needle size should be either medium or fine. Apply 1 to 2 thin coats of high gloss gray paint to the exterior. For Scale Coat paint, Mix 1 part thinner to 1 part paint (50/50). Air Pressure for Scale Coat 2 set at 20-25 psi. Practice applying the gray on scrap styrene or junker rolling stock first. The key here is that the final finish appear very smooth and slick. If you're using an acrylic, apply 1 to 2 gloss coats of clear. Allow the finish to cure thoroughly. With SC-II, I now give it 3 to 4 days. For acrylics, it's good to play it safe and wait at least one week.
5. Alclad II Chrome step: Airbrush needle size: FINE works best! I no longer recommend "medium" as in the past. (for Paasche, fine would be a #1 needle) Air pressure: between 12psi and 15psi. The fan width should be very narrow. Air brush distance to shell: 1 to 2 inches. Stroke Speed: medium speed. Not slow, not fast.
5a.Lightly spray each of the sides and roof in long strokes, as if you were using a slim paint brush. Do not dump it on! If you missed a spot, don't worry. Catch it on the next coat. After your first coat, wait 10 minutes. Yes, it looks transparent-dark gray, don't worry, that's normal. Wait 10 minutes. Remember, if you dump it on, you'll be gritting your teeth. (yes, ask me how I know!).
5b. Apply your 2nd Alclad coat, same technique as above. Make sure you get into the little crevices around the diaphrams (I don't bother removing mine). After you finish this 2nd coat, WALK AWAY from the shell and don't look at if for at least 15 minutes. Come back and check it out. If it's still a bit dark, apply a 3rd thin coat of the Alclad. You'll likely be smiling when you finish. Don't worry if it looks too shiny. If a 4th coat is needed, apply it with a slightly faster stroke.
6. Wait 1 to 2 days. Apply even coat of acrylic based Gloss Clear coat. This will tone the shine down slightly. If using solvent based clear, wait at least 3 days. For clears I prefer acrylics.
7. Apply your decals. You can use Microset normally to move decals into postion, however, apply the Microsol lightly around the decal edges.
8. Now for your "sheen effect": Apply another thin coat of gloss clear to seal your decals. Your model's finish should be similar to my Walther's finish.
8a. Decision time. If you want your cars finish to appear more "aged" then add another coat of gloss clear, and so forth until you get the weathered sheen desired. Don't over do it or you'll wind up with a finish that looks similar to a floquil silver .
However, before toning down the sheen too much, check photos of the prototypes. The Santa Fe, Atlantic Coast Line, Southern, and CB&Q did a nice job of maintaining their streamlined cars' overall appearances like these prototype shots of the SCL Silver Comet just before the Amtrak era.
Last edited by AntonioFP45 on Sun Oct 03, 2010 9:41 pm, edited 1 time in total.